- How to Create a Zapier Text Messaging Action Integration Triggered by a Webhook
- Available Webhook Actions
- Creating a Messaging Action
- Step 1: Login to your Skycore account
- Step 2: Create your Messaging Action
- Step 3: Choose your Messaging Action & Messaging Campaign
- Step 4: Review Integration Data Fields
- Step 5: Copy the Listener End Point URL
- Step 6: Activate your Integration in Skycore
- Step 7: Login to your Zapier Account
- Step 8: Setup the Event Trigger
- Step 9: Setup the Action Event
- Step 10: Add your Data Fields in Zapier
- Step 11: Test & Run Your Integration
How to Create a Zapier Text Messaging Action Integration Triggered by a Webhook
This guide will help you create a Messaging Action in Skycore that can be triggered by another app through Zapier. This is done by connecting Zapier’s webhooks to Skycore’s integration system, enabling the automatic triggering of the Messaging Action. Zapier offers pre-built webhooks that require no coding or development. All you have to do is select webhooks by Zapier, provide some necessary details, copy the URL provided by Skycore, and enter that URL in Zapier to establish the connection between the two systems. If you require further information about Zapier’s webhooks, refer to this article: Webhooks Guide
Available Webhook Actions
The following list shows all available messaging webhook actions. You can read more about each action in the sections below.
- Send an SMS
- Send an MMS
- Send a Saved MMS (ie an MMS Template you created and saved in the Skycore platform)
- Subscribe a user to a campaign
- Unsubscribe a user from a campaign
Creating a Messaging Action
The available Skycore actions are send an SMS, send an MMS, send saved MMS, subscribe a user to a campaign, unsubscribe a user from a campaign. The following steps and screenshots will walk you through an example of an SMS being sent to a user when they’ve abandoned their cart on Shopify.
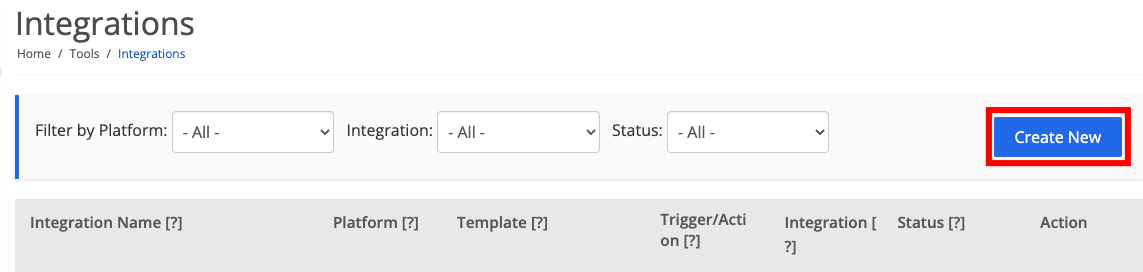
Step 1: Login to your Skycore account
Go to the Integrations page in the Tools tab of your Skycore account. Click ‘Create New’.
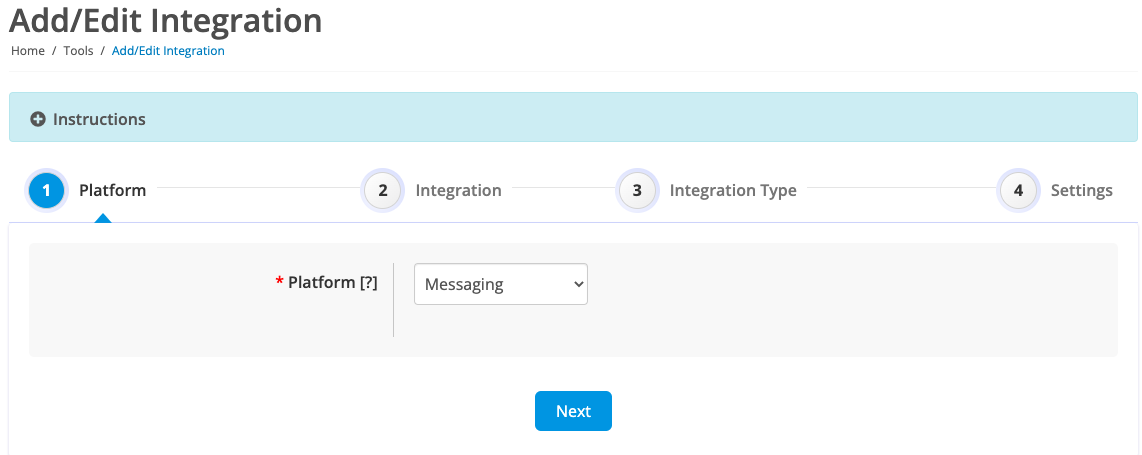
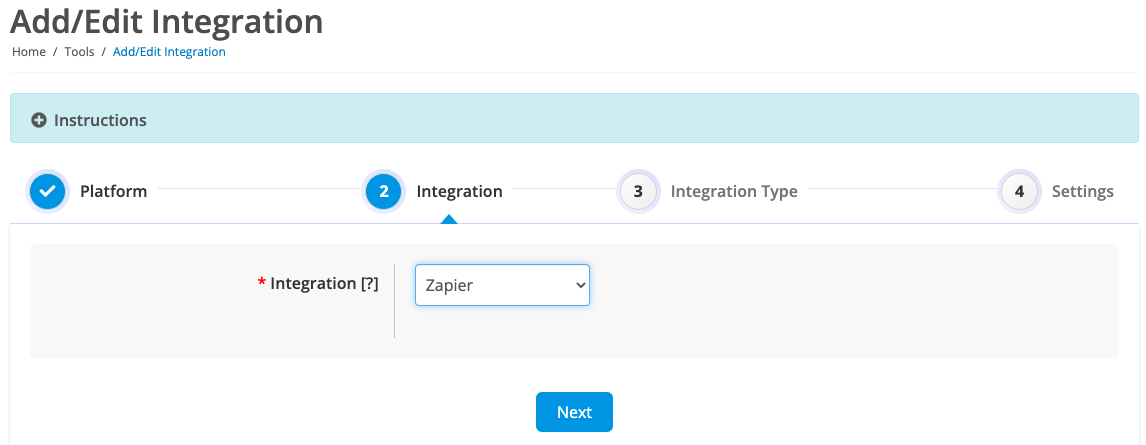
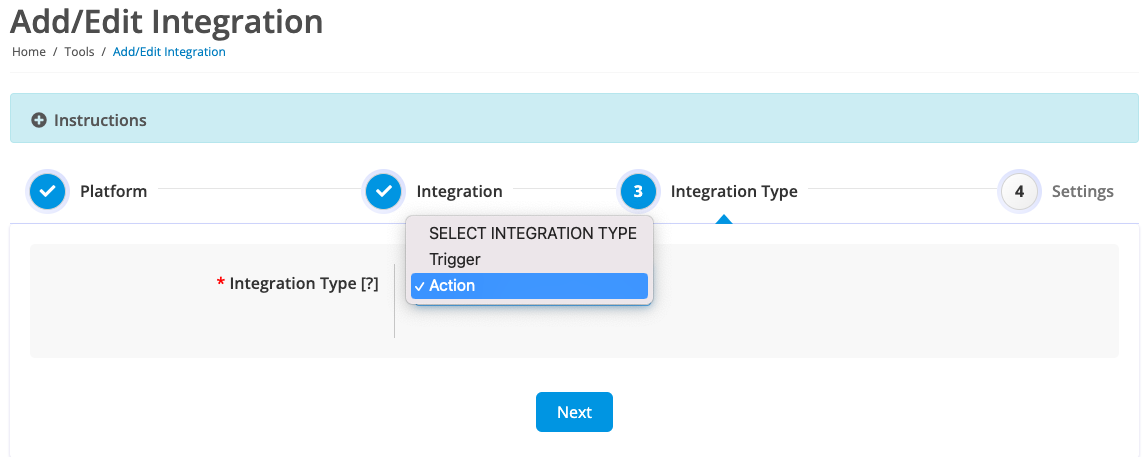
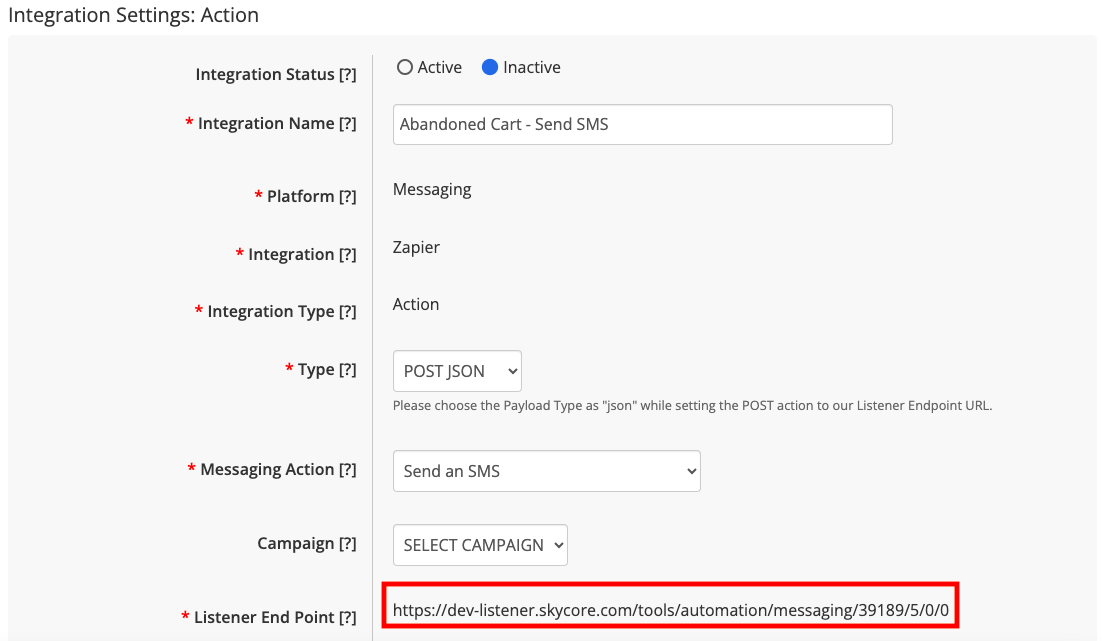
Step 2: Create your Messaging Action
Create your Messaging “Action” on the Skycore platform on the integrations page. Choose Messaging as the Platform, Zapier as the Integration, and Action as the Integration Type.
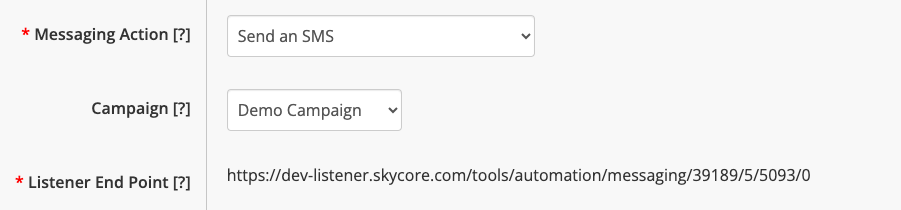
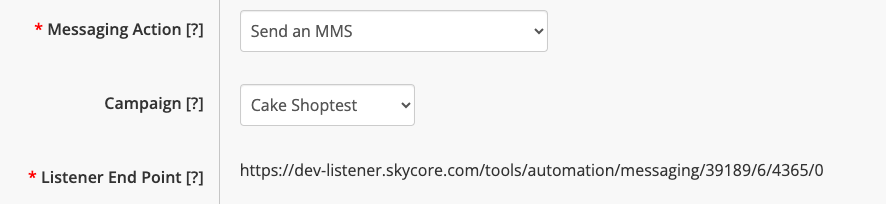
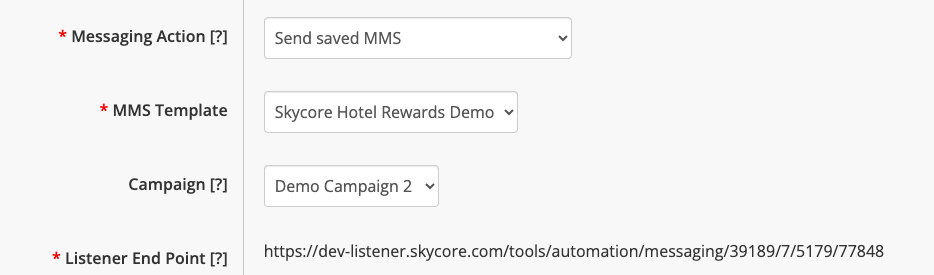
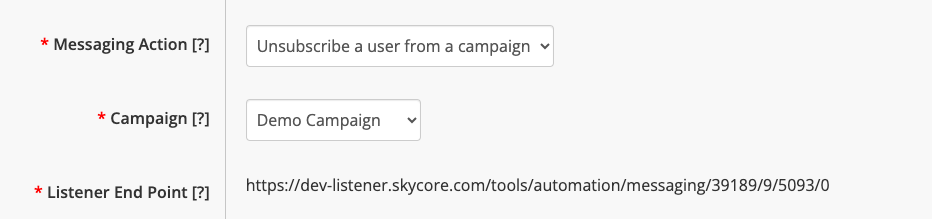
Step 3: Choose your Messaging Action & Messaging Campaign
Fill out the integration details and select the messaging action you want to use. Skycore offers five messaging actions that are executed by creating a “Zap” triggered from another app. Each action is listed below along with an example of how each can be used. You can also choose a campaign to associate each integration action with from the drop-down menu provided. Selecting a campaign is optional for the Send an SMS, Send an MMS, and Send a Saved MMS actions. Selecting a campaign is required for the Subscribe a user to a campaign and Unsubscribe a user from a campaign actions.
Option 1: Send an SMS
The “Send an SMS” action, when triggered by another app, enables the sending of an SMS message to a user. The SMS message can be either pre-created as part of a campaign or you can utilize the “sms-message” integration data field to transmit the message text to the endpoint URL. The “Campaign” field is not required for this action but can be chosen to utilize opt-in settings set in the campaign to gain a users consent to receive messages from you prior to sending the SMS message. This action can be utilized, for instance, to send a text message to a user who has abandoned their cart on a website, serving as a reminder that they still have items in their cart.
Option 2: Send an MMS
The “Send an MMS” action, when triggered from another app, allows you to send an MMS message to a user. You have two options for the MMS content: you can either pre-create it and associate it using the campaign drop-down menu, or you can utilize the MMS integration fields to pass the MMS content data to the endpoint URL. The “Campaign” field is not required for this action but can be chosen to utilize opt-in settings set in the campaign to gain a users consent to receive messages from you prior to sending the MMS message. This action can be employed in various scenarios, such as sending a user an MMS coupon as a gesture of appreciation after their initial purchase.
Option 3: Send a Saved MMS
When triggered from a third-party app, the “Send a Saved MMS” action sends a user a pre-built MMS template. You will need to choose which template you wish to use from the drop-down menu. The “Campaign” field is not required for this action but can be chosen to utilize opt-in settings set in the campaign to gain a users consent to receive messages from you prior to sending the Saved MMS message. This action is useful when you’ll be sending an MMS using the same layout to multiple users. If you need help creating an MMS template, refer to this article: MMS Templates
Option 4: Subscribe a User to a Messaging Campaign
The “Subscribe a User to a Messaging Campaign” action enables you to add a user, or subscribe them, to an existing messaging campaign’s opt-in list when triggered from another app. The Campaign setting is a required field here to subscribe the user to a specific campaign. If you need assistance creating campaigns, use this article: Campaigns. This action can be used, for example, to add a user to a loyalty club campaign when the complete a sign up form online.

Option 5: Unsubscribe a User from a Messaging Campaign
The “Unsubscribe a User from a Messaging Campaign” action enables you to remove a user from an existing campaign. The campaign setting is a required field for this action to unsubscribe the user from a specific campaign. For example, this action can be used to remove a user from a campaign when the user cancels their membership, therefore, they should no longer receive promotional messages.
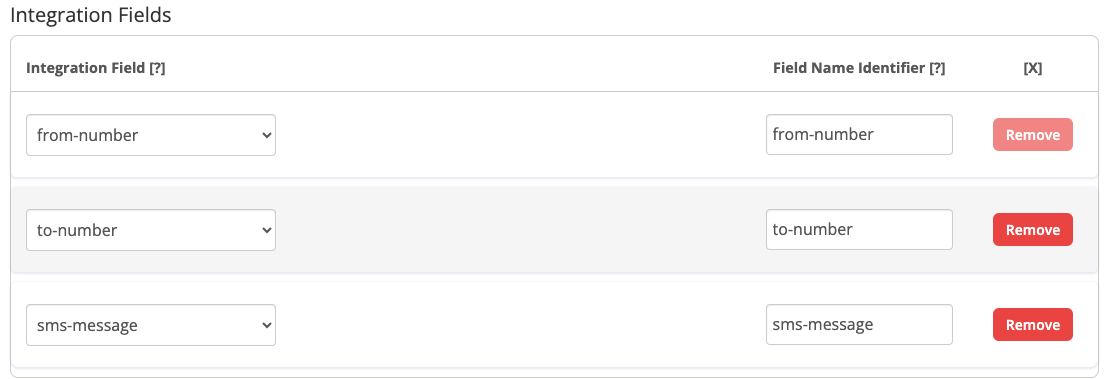
Step 4: Review Integration Data Fields
Each action enables you to use integration data fields that can be passed through the listener endpoint URL. Review the list of “integration fields” for each action and exclude any fields that you do not want to be passed to the endpoint URL. These data fields will be later added in Zapier so be sure to copy or write down the data fields you will be using in the integration. The available integration data fields differ for each type of Action.
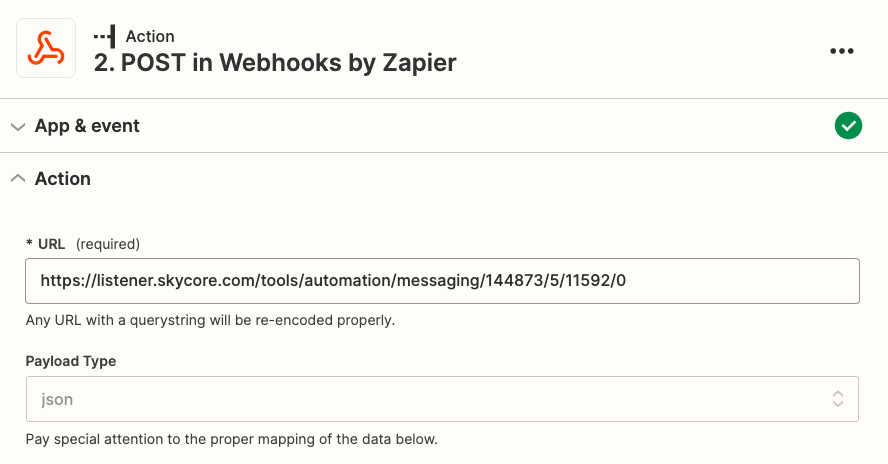
Step 5: Copy the Listener End Point URL
Copy the Listener End Point URL, which will be used in your Zap in Zapier. Save your integration once all of the necessary fields are filled out.
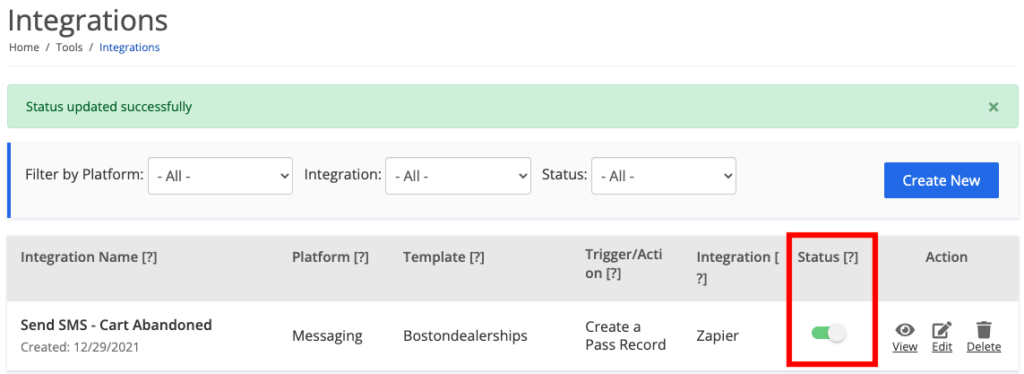
Step 6: Activate your Integration in Skycore
Set the Integration Status to “Active” when you are ready to use it.
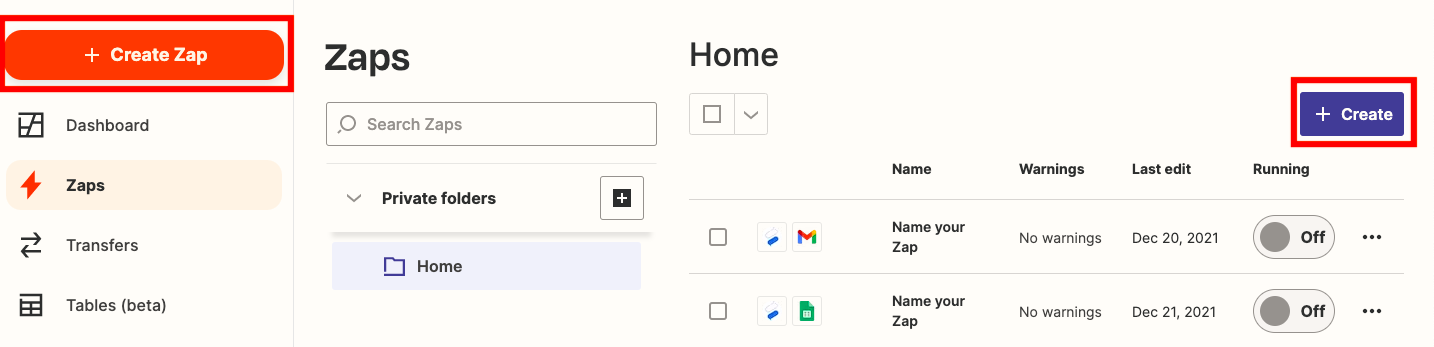
Step 7: Login to your Zapier Account
Login to your Zapier account and create a Zap:
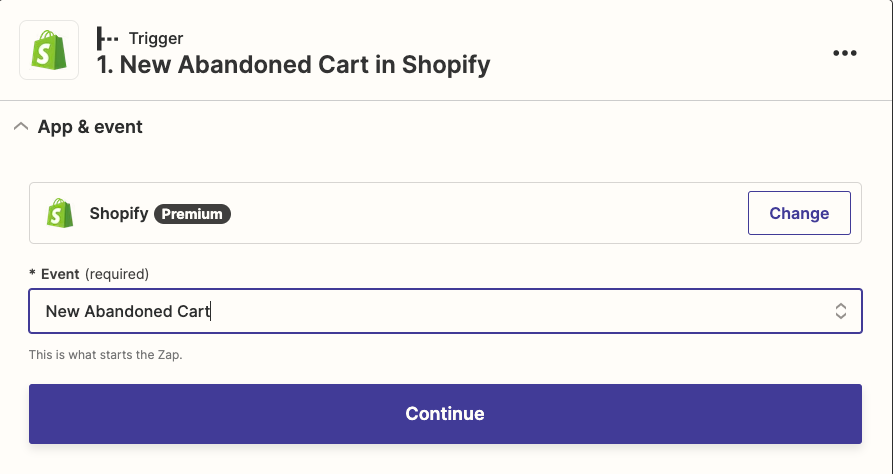
Step 8: Setup the Event Trigger
Choose the app for the “Trigger” that will cause the Zap to occur. Choose the “Trigger” event from the other app.
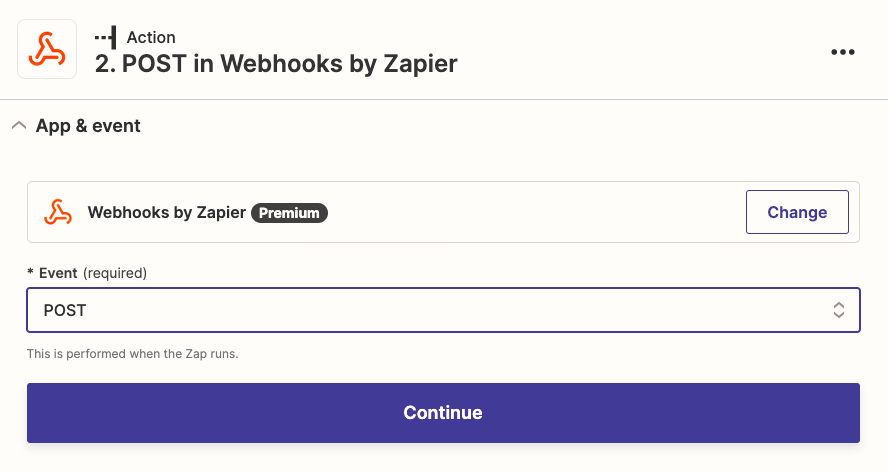
Step 9: Setup the Action Event
Choose Webhooks by Zapier for the event “Action” and select the “Action” event. Enter the Listener End Point URL from step 3 above. Choose the payload type and add any other necessary details.
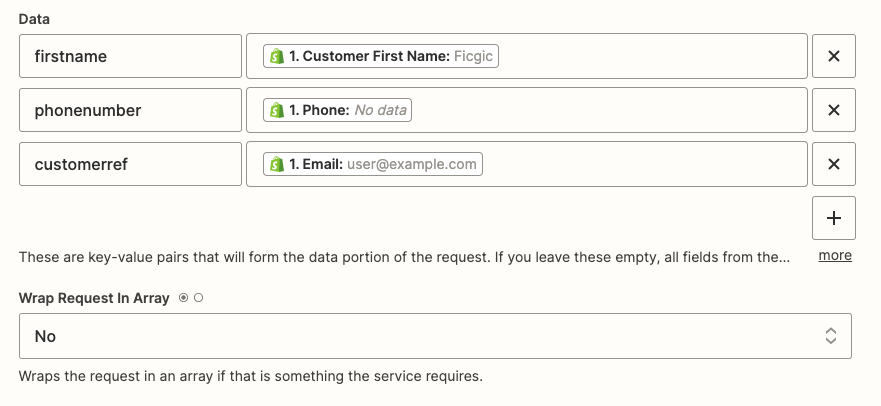
Step 10: Add your Data Fields in Zapier
Add the data fields from step 4 above that you need to pass through the URL to your Zap in Zapier. You will need to map the Skycore data fields to data fields available from the app that you are using for your event trigger. Map your fields by choosing from the drop-down menu provided in Zapier.
Step 11: Test & Run Your Integration
Once you’ve created your Zap for a Messaging Action in Zapier, you can test the integration to make sure it is working properly. After testing, click “Publish” in the top right corner of the Zap creator and toggle your Zap to “Running” status when you are ready to use it. For additional help creating and managing Zaps, read more here: Creating Zaps