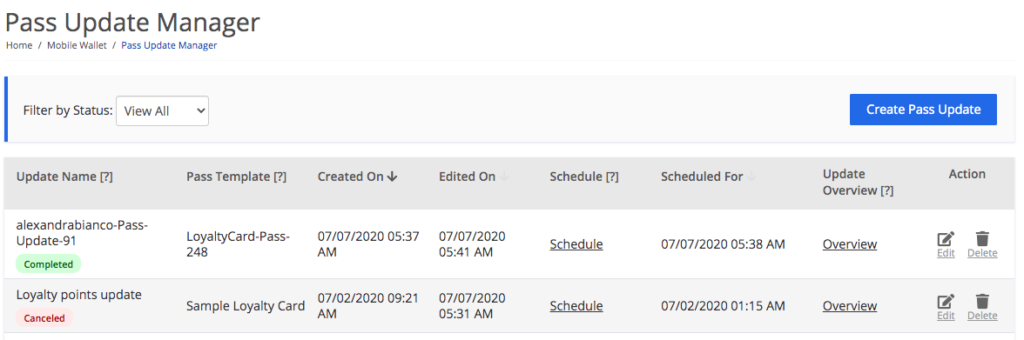
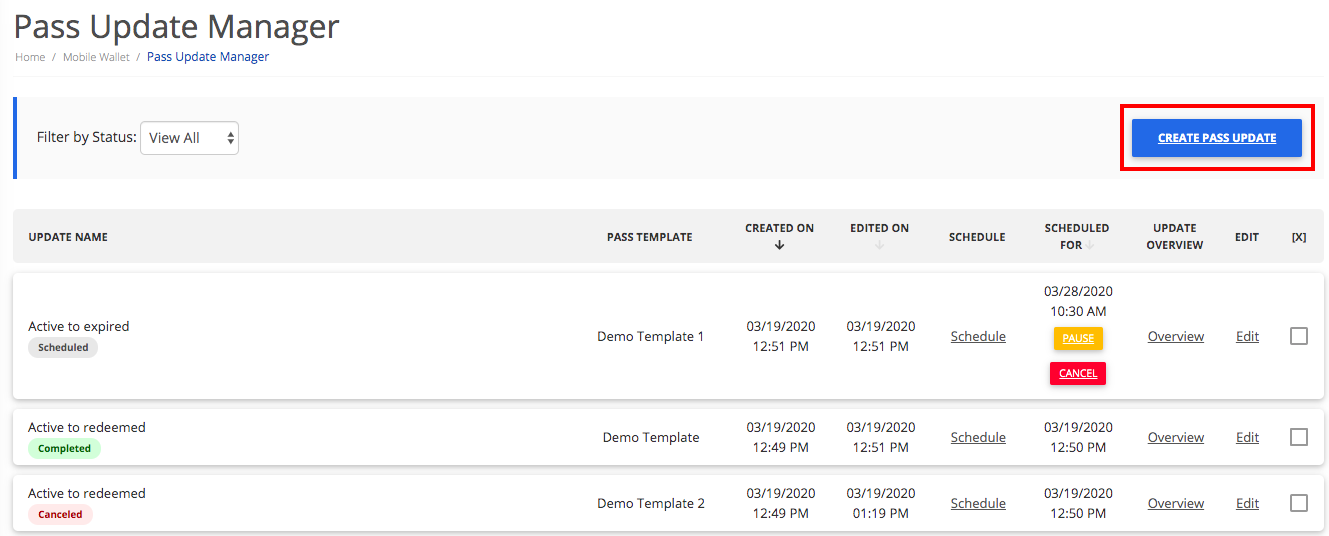
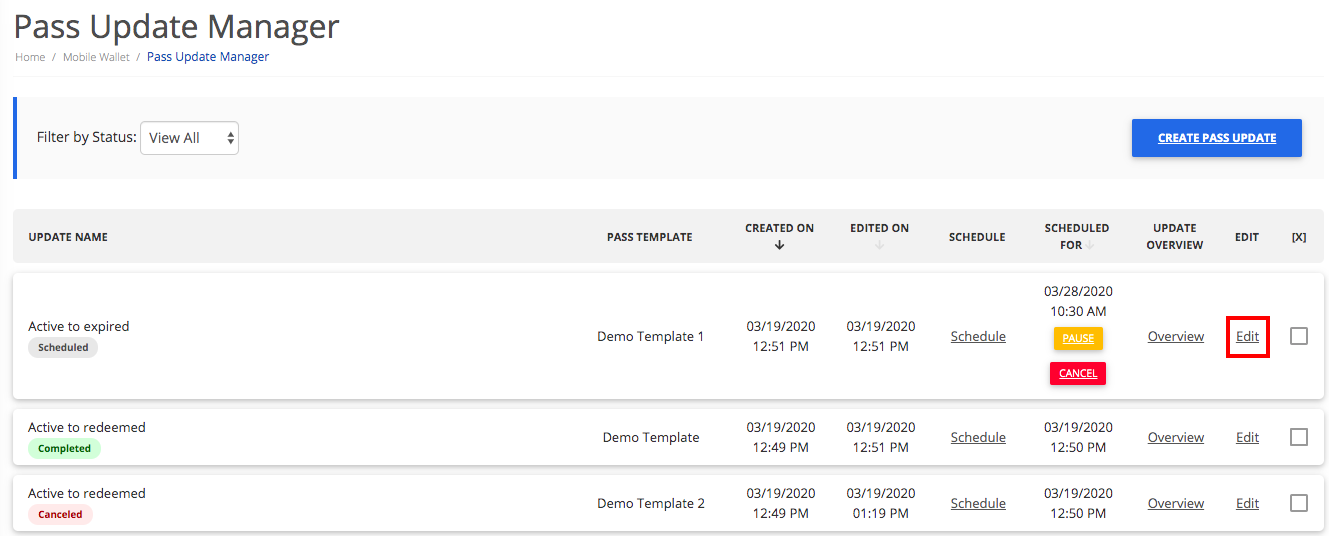
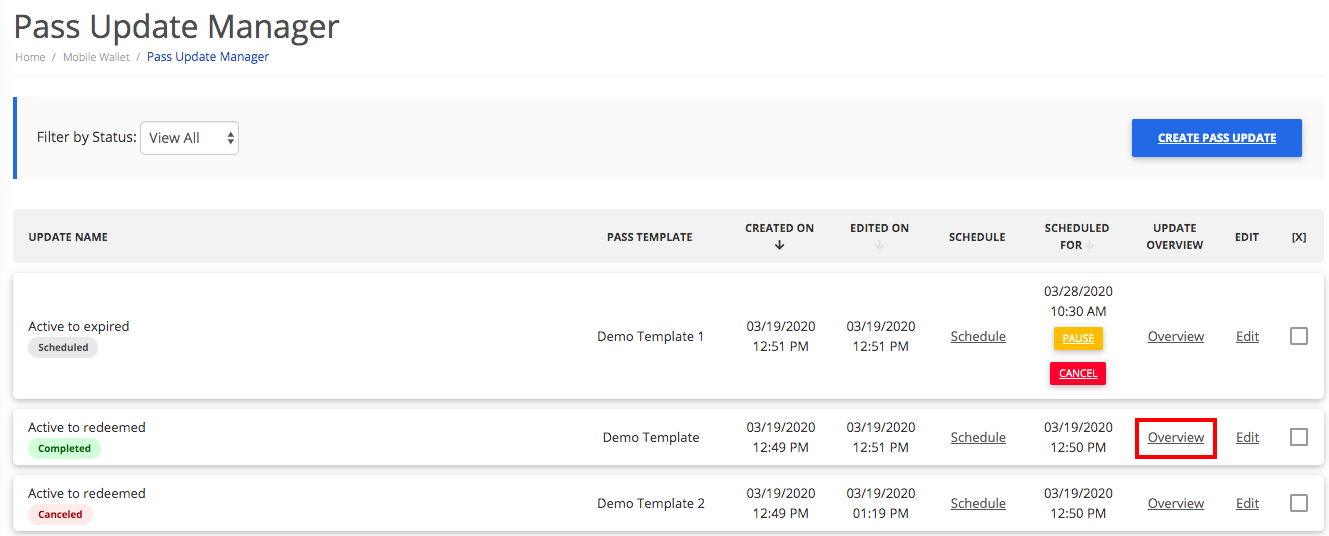
The Pass Update Manager enables users to create and schedule pass updates in bulk. Using the up and down arrows, you can filter each column in ascending or descending order. You can also filter the results by status: Draft, Scheduled, In Progress, Completed, Canceled, Paused, or Failed. Updates can be paused if they are ‘Scheduled’ for a future date and time and are not ‘In Progress’ yet.
| Setting | Description |
|---|---|
| Update Name | This is used for internal purposes only to differentiate updates from each other in the Pass Update Manager. The status of the update will also appear below the Update Name. |
| Pass Template | This is the Pass Template being used for the bulk update. All Pass Records associated with the selected Pass Template and Update Type will be updated. |
| Created On | The date that the update was created on. |
| Edited On | The date that the update was edited on, if applicable. |
| Schedule | Select a day and time to schedule the update. The update time will be in the account’s timezone. |
| Scheduled For | The date and time that the update is scheduled to take place on. |
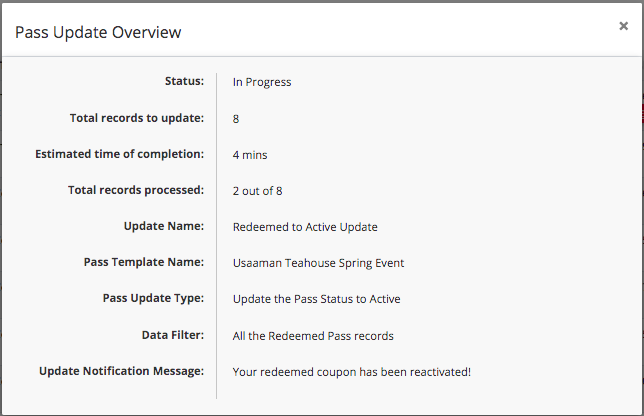
| Update Overview | This button opens a page called Pass Update Overview and gives more detailed information on the update. |
| Edit | This allows you to edit an update if the status of the update is: ‘Draft’ or ‘Paused’ |
| Delete | This will remove the update from the Pass Update Manager page. |
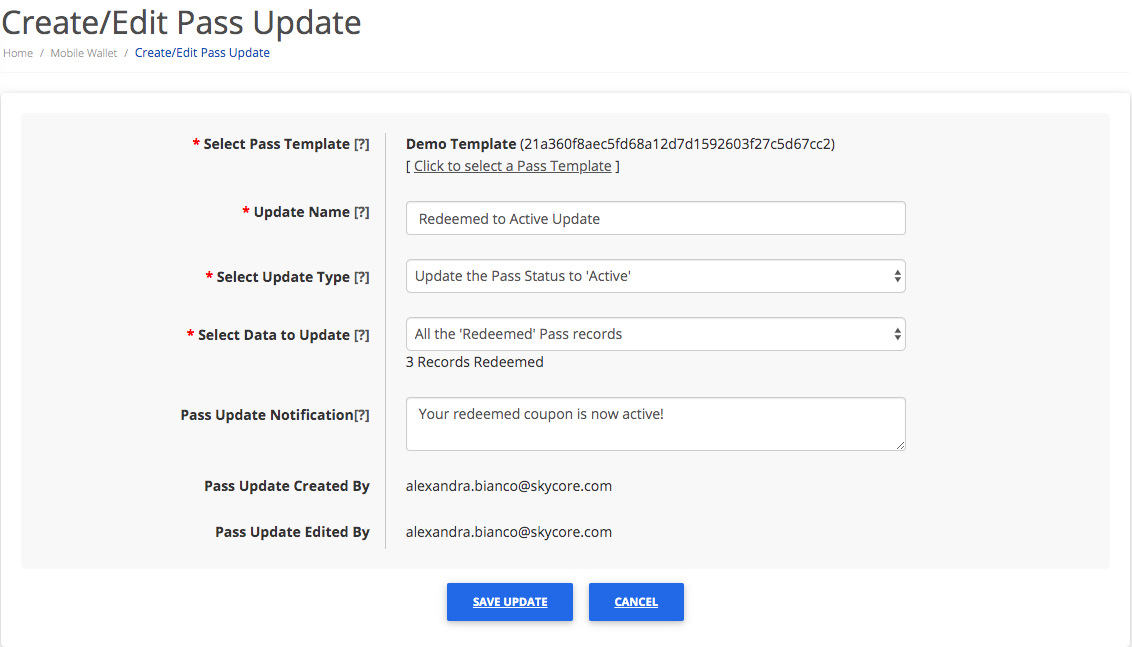
Create Update #
Steps to Create a Pass Update
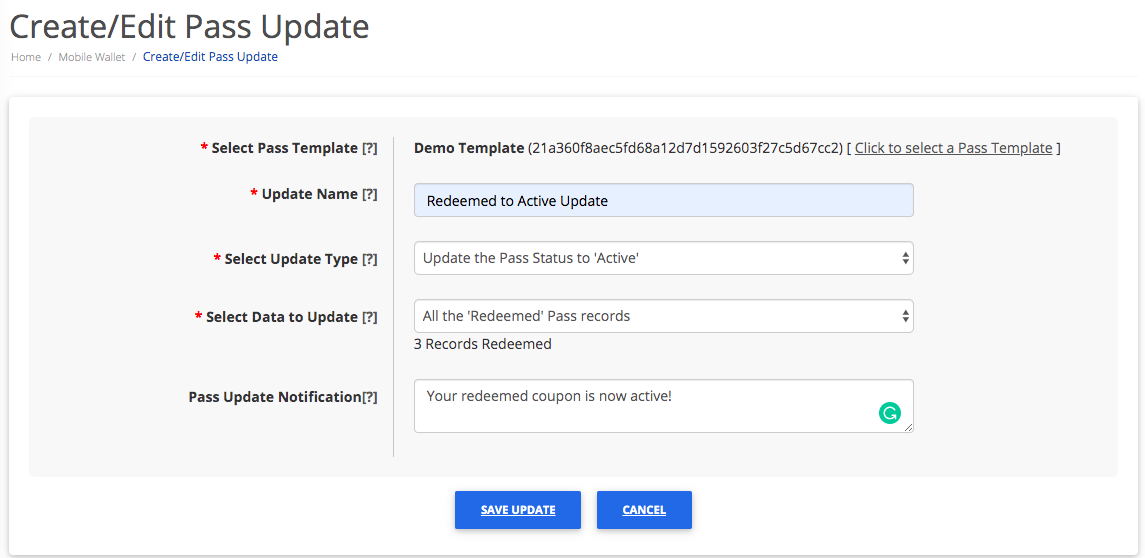
1. Choose the Pass Template associated with the Pass records that you want to update. If you have multiple Pass Templates in your account, ONLY the Pass records associated with this template will be updated.
2. Choose a name for your update for internal use only. This update name will not be visible on the Pass.
3. Choose the type of update that you want to perform from the drop-down menu.
Update Types
| Update Type | Description | When to Use |
|---|---|---|
| Pass Template Update | This performs an update on the entire pass template, meaning all records installed for this Pass Record will be updated. | Choose this option when an update needs to be reflected on all Pass records including installed, uninstalled, expired, voided, redeemed, and active Passes. |
| Update the Pass Expiration Timestamp | This will update the expiration timestamp on pass records associated with the selected Pass Template. When this update type is selected, you will see a box to choose a date and time for the new timestamp. | Choose this option when you need to extend the expiration date on a pass or expire passes that are currently active. |
| Update the Pass Status to ‘Redeemed’ | This will update the pass status to ‘Redeemed’ for the selected data type. If an update to the pass status hasn’t already taken place, a field will appear on the back of the Apple Wallet Pass and below the Google Pay Pass saying: ‘Pass Status: Redeemed’If you’ve previously updated the pass status, the existing field will be updated to reflect the new Pass Status. | Choose this option when the pass has been redeemed and you do not want the user to be able to redeem the pass more than once. |
| Update the Pass Status to ‘Expired’ | This will update the pass status to ‘Expired’ for the selected data type.This update will cause the barcode to be greyed out on Apple Wallet Passes and read ‘this pass has expired’ below the barcode. For Google Pay Passes, this update will move the Pass into the ‘Expired Passes’ section in the App.If an update to the pass status hasn’t already taken place, a field will appear on the back of the Apple Wallet Pass and below the Google Pay Pass saying: ‘Pass Status: Expired’If you’ve previously updated the pass status, the existing field will be updated to reflect the new Pass Status. | Choose this option when a pass is no longer valid after a certain time. |
| Update the Pass Status to ‘Voided’ | This will update the pass status to ‘Voided’ for the selected data type. If an update to the pass status hasn’t previously taken place, a new field will appear on the back of the Apple Wallet Pass and below the Google Pay Pass saying: ‘Pass Status: Voided’If you’ve previously updated the pass status, the existing field will be updated to reflect the new Pass Status. | Choose this option to invalidate a pass for any reason. |
| Update the Pass Status to ‘Active’ | This will update the pass status to ‘Active’. Updating the pass status to ‘Active’ will remove the ‘Pass Status’ field from the back of the Apple Wallet Pass and below the Google Pay Pass. | Choose this when you have a pass or passes that are expired, redeemed, or voided that you want to update with a new offer or new balance, for example. |
| Update from CSV Data | This performs an update from a CSV import. If this update type is selected, you will be prompted to upload a CSV file when creating the update. Clicking ‘Save Update’ will begin the import process. You will not be able to schedule the update until the data has been successfully imported. You will need to include the Pass IDs in the CSV file. You can view a report once the file is imported to see if all records from the file have been successfully imported or not. You can also schedule the update even with a single successfully imported record. | Choose this option when you have specific data to be updated for individual Pass Records. |
4. Choose which data you want to update for the Pass records associated with the selected Pass Template.
Data Types
| Data Type | Description |
|---|---|
| All Pass records for the selected template | Updating this type of data will update any pass record associated with the selected Pass Template. This includes Passes that are installed, uninstalled, expired, redeemed, and voided. |
| All ‘Expired’ pass records | All Pass records for the selected template with the Pass Status ‘Expired’ or with an expiration timestamp in the past will be updated. |
| All ‘Redeemed’ pass records | All Pass records for the selected template with the Pass Status ‘Redeemed’ will be updated. |
| All ‘Voided’ pass records | All Pass records for the selected template with the Pass Status ‘Voided’ will be updated. |
| All ‘Active’ pass records | All Pass records for the selected template with the Pass Status ‘Active’ will be updated. |
| All pass records expiring on and before the selected date | When this is selected, a box will appear below the drop-down menu so that you can select a date. This will update all pass records for the selected template which are set to expire on or before the date you’ve selected here. |
| All pass records expiring on the selected date | When this is selected, a box will appear below the drop-down menu so that you can select a date. This will update all pass records for the selected template which are set to expire on the date you’ve selected here. |
5. Add a custom Pass Update Notification to let users know that their pass has been updated and what exactly has been updated (ex. Your expired coupon has been updated to active!). Learn more about Pass Update Notifications. The notification will appear as a new field on the back of the Apple Wallet Pass and below the Google Pay Pass. The notification will also appear on the lock screen of IOS devices with the Pass installed. If you do not add a notification, the pass will still be updated.
6. After creating an update and clicking ‘Save Update’, you will be redirected to the Pass Update Manager page. Clicking ‘Save Update’ does NOT automatically schedule the update. You will need to click ‘Schedule’ on the Pass Update Manager page to schedule the update.
Edit Update
Editing the Pass Update will show all of the same fields in the Create Update page except for two new fields: Pass Update Created By and Pass Update Edited By. These two fields will inform you who created the update and the last person to edit the update.
| Setting | Description |
|---|---|
| Pass Update Created By | The user who originally created the update. |
| Pass Update Edited By | The user who last edited the update. |
Schedule Update #
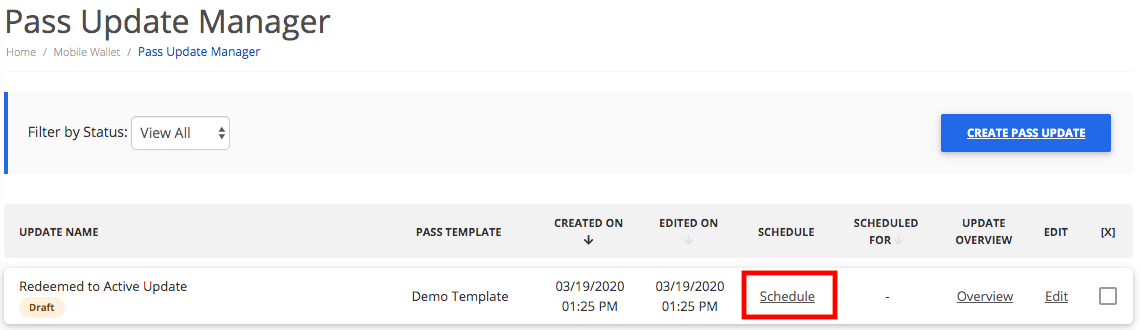

Steps to Schedule an Update:
1. After creating the update, click the ‘Schedule’ button that correlates to the update you wish to schedule.
2. Choose the date that you want the update to take place on. The date field will always be pre-filled to show the current date. If you want the update to happen immediately, do not change the date field.
3. Choose the time that you want the update to happen. Updates can be scheduled to happen immediately or at a later time. Updates can also be scheduled based on a certain timezone using the drop-down menu.
4. Clicking ‘Schedule’ will set the update to take place for the date and time you have scheduled it for.
5. The status of the update is shown alongside the ‘Schedule’ button for each update.
Status Definitions
| Status | Definition |
|---|---|
| Draft | An update that has been created but not yet scheduled |
| Completed | An update that has been created, scheduled, and successfully completed |
| Canceled | An update that has been scheduled and canceled before it was completed |
| In Progress | An update that is currently taking place |
| Paused | An update that has been scheduled but paused before it was completed |
| Failed | An update that has been scheduled but failed to complete |
| Scheduled | An update that has been created and scheduled |
Update Overview #
| Setting | Description |
|---|---|
| Status | The status of the update. |
| Total Records to Update | The number of records to be updated |
| Estimated Time of Completion | The estimated time it will take to perform the update. |
| Total Records Processed | The number of records processed out of the total records to update. |
| Update Name | The internal update name. |
| Pass Template Name | The name of the Pass Template used for this update. |
| Pass Update Type | The update type chosen for this update. |
| Data Filter | The type of data that was selected to be updated for this update. |
| Update Notification Message | The Update Notification set for this update (if any). |